Cumulus VX with Vagrant


In this blog post I explain how to build a test environment to get hands-on experience with Cumulus VX, Vagrant and a touch of shell scripting.
Rise of the Rocket Turtle!
Recently I've been playing around with Cumulus VX, a virtual appliance from the company it is entirely forgivable to assume are plush toy makers first, networking software house second, from the amount of Rocket Turtle tweets out there.
Looking beyond the marketing tactics Cumulus are an interesting, and timely, addition to the networking industry. The commoditization of networking kit that is 'white-box switching' opened up a new field of opportunity[1], a network OS that is not tied to a specific vendor's hardware. Pick your top of rack switch from the compatible list then select your preferred OS, step forware Cumulus, and rivals such as Pica8.
Tools, tools, tools etc.
In addition, the OS is a Linux distribution based on Debian, and thus opens up new ways of provisioning, configuring and automating. All those tools and methods that the server/software crowd have been using for years to make their lives easier are now candidates for adoption in networking. No waiting for networking vendors to open up their OS for tools like Puppet & Chef, you've already got that in Cumulus Linux.
Access denied
One major source of annoyance when I originally got into networking was the need to have the right kit and code to play around with more advanced protocols, 'Sorry son, no VPLS for you. You don't have the right linecard, sup engine, IOS license combination'. Thankfully virtualization means that building home labs no longer requires salvaging decommisioned routers and having a 42U rack of kit in your bedroom. Open-source images and virtual applicances emulating hardware mean hands-on is relatively accessible.
Why Vagrant?
When I first became interested in looking beyond traditional networking at some of the blogs talking about DevOps I found the huge number of new tools and platforms quite overwhelming, it didn't help that lots of them have weird names, previously mentioned Puppet, Chef, Ansible etc. What the hell was all this stuff? My tool set was Putty and a screwdriver.
Now, however, I've learned that there is nothing to fear from tools and platforms with ridiculous names, they are something to embrace. A couple of hours reading up and experimenting on a new platform is a great way to cut through all the babble around DevOps and really gain some tangible insights into why this stuff matters. Spoilers: It makes things easier!
If you scan through the Vagrant website it talks about confusing stuff like 'portable work environments' and 'consistent workflow', this bland language is attempting to describe a very useful tool.
VMs - the old way
I'll assume you are familiar with building virtual machines using hypervisors such as Workstation or VirtualBox. A rough 'to do' list to get a new VM up goes something like:
- Download VM image
- Create new VM on your hypervisor.
- Input various setting for the VM parameters and networking.
- Boot VM from image
- Go through OS provisioning.
All this is an exciting new world of possibilies the first time but soon becomes a dreary grind, especially if, like me, you keep screwing up your VMs and need to regularly blow them away and start afresh.
vagrant up
Vagrant fits in here by automating some of those boring repetitive tasks involved in building VMs so that provisioning a new VM, or group of VMs, becomes a much quicker, less involved process. You do not have to actually interact with a hypervisor or the booting OS at all, just with Vagrant.
Vagrant introduces the concept of boxes, these are the packages for Vagrant environments and in their most basic form they are an Operating Systems tailored to run with Vagrant and publicly available from the repo. So rather than downloading an Ubuntu image then booting a VirtualBox VM using that image, we can download the relevant Vagrant box and just use the 'vagrant up' command from our command-line to bring up a new Ubuntu VM, without touching the hypervisor nor going through all the boot prompt. It is essentially lazy corner cutting, and that's why I'm a fan.
Vagrantfile
So what about all those prompts in the boot process you might think, those are where we set the basics like IP addressing. In the Vagrant environment a 'Vagrantfile' is created. This is a short Ruby script that allows provisioning parameters to be set prior to boot which Vagrant will then communicate to the new VM. You don't have to be an expert in Ruby to start manipulating this file, setting IP addresses, system names etc. plus dig a little deeper and this file can be used for inline provisioning scripts or reference an external shell script.
A sandpit of my own
Here are my goals:
- Get some hands-on experience with Cumulus VX.
- Use Vagrant to boot my VX and learn the basics of that tool.
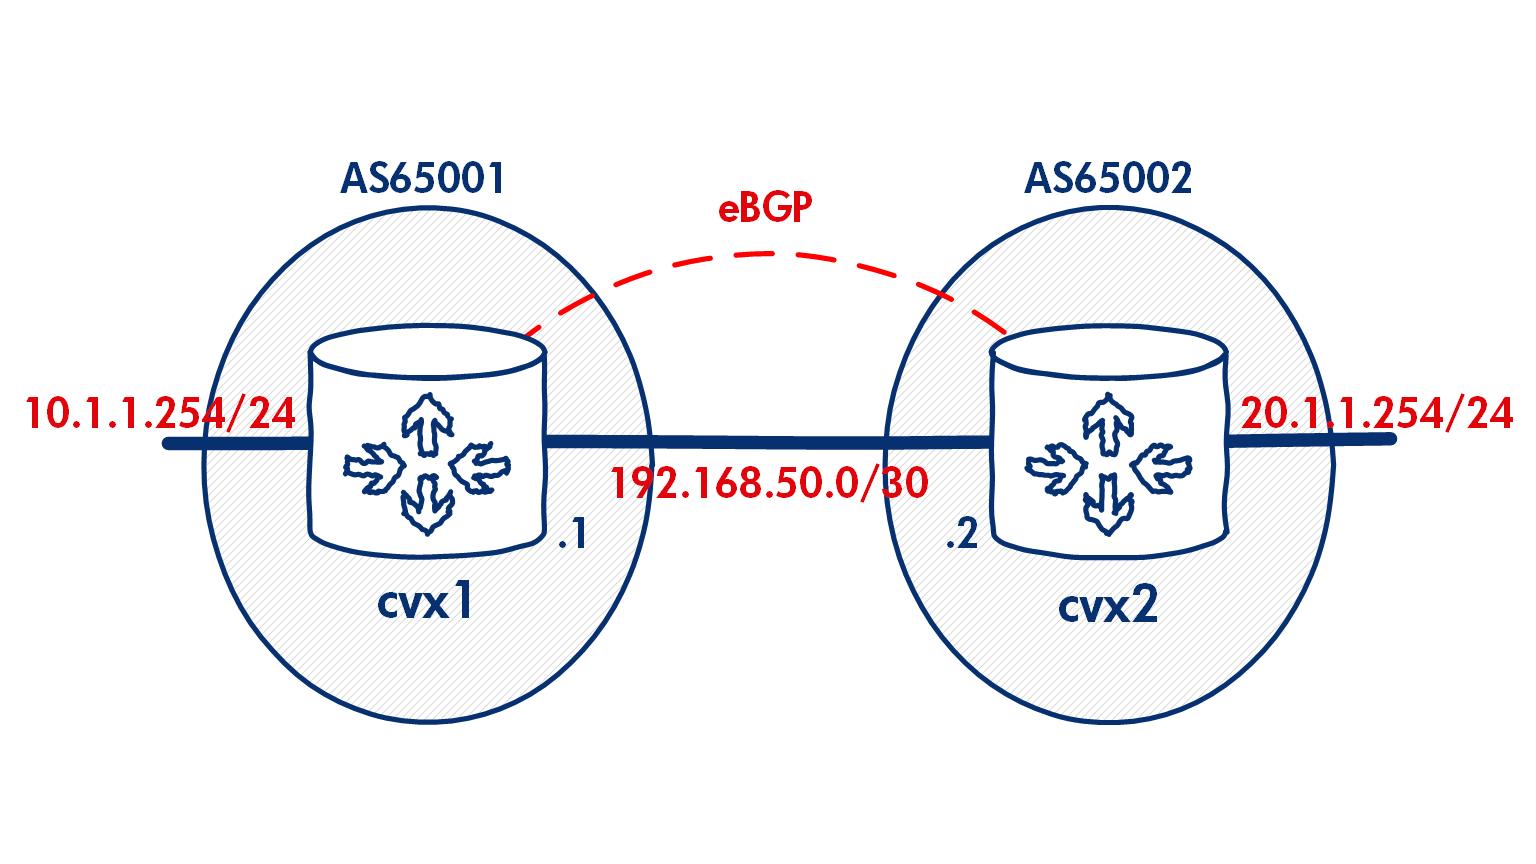
Cumulus have put together some potted demos that use Ansible to build a spine and leaf network. That looks great but I wanted to break this open a little and start off on my own terms to build a network of a couple of eBGP speakers that looks like this:
I found this to be a very simple exercise, I had two VX running on my laptop and exchanging prefixes within an hour of my first attempt. But that meant some manual interaction with the VX CLI after it had booted. I did a bit more research into Vagrant to iron out those provisioning steps so I now present my 'How To VX w/Vagrant'
How To VX w/Vagrant
The instructions below detail how to bring up Cumulus VX using Vagrant on a Windows PC. The official Cumulus documentation is available here, I've elaborated on this from my own experience.
Step One - Dowload files
Download the following:
- Vagrant. I'm using Win7 64-bit.
- Virtualbox - Vagrant charge real cashmoney for use with VMware, I'm a cheapskate so I'm using this freebie as my provider/hypervisor.
- Git - if you're planning to use Vagrant on Windows install this and use the Git bash as your command-line, this avoids some mind-numbing problems Wins has with SSH to hosted Vagrant boxes.
- The Cumulus VX Vagrant Box.
Install Vagrant, Virtualbox & Git.
Step Two - Create vagrant box
Open Git Bash from Start > All Programs > Git
Use this as your command-line for Vagrant rather than the Wins cmd.
Install the Cumulus plugin for Vagrant:
$vagrant plugin install vagrant-cumulus
Now add the Cumulus VX to your Vagrant environment, the name of the box is cumulus-vx-2.5.3 followed by the full path to the .box file you've already downloaded.
vagrant box add cumulus-vx-2.5.3 C:/cumulusdemo/CumulusVX-2.5.3-4eb681f3df86c478.box
Those are the basic steps to prepare to bring up a VX, and the offical docs provide details of how to boot a single device, but we now want to manipulate the Vagrantfile to build our two BGP speakers.
Step Three - Configure Vagrantfile
Vagrant should now have create a number of folders and files on your system, you will need to locate the Vagrantfile for the new box, cumulus-vx-2.5.3. On a Windows system this will be in your user directory:
C:\Users\nevilljo\.vagrant.d\boxes\cumulus-vx-2.5.3\0\virtualbox
Now I prefer to create a new directory to build a vagrant environment and copy the Vagrantfile to it, if you do this, make sure you leave the original in place.
The Vagrantfile is used to define the environment that we want to create, here is my file to create two Cumulus VX nodes:
Vagrant.configure("2") do |config|

config.vm.define "cvx1" do |cvx1|
  cvx1.vm.box = "cumulus-vx-2.5.3"
  cvx1.vm.network :private_network, ip: "192.168.50.1/30"
  cvx1.vm.network :private_network, ip: "10.1.1.254/24"
  cvx1.vm.provision "shell", path: "cvx1_on.sh"
  end

config.vm.define "cvx2" do |cvx2|
    cvx2.vm.box = "cumulus-vx-2.5.3"
    cvx2.vm.network :private_network, ip: "192.168.50.2/30"
    cvx2.vm.network :private_network, ip: "20.1.1.254/24"
    cvx2.vm.provision "shell", path: "cvx2_on.sh"
    end

end
Vagrantfile breakdown
config.vm.define "cvx1" do |cvx1| - defines a vagrant box named cvx1.
cvx1.vm.box = "cumulus-vx-2.5.3" - designates that cvx1 will be a Cumulus VX box.
cvx1.vm.network :private_network, ip: "192.168.50.1/30" - used to set the IP addressing of the device interfaces. The order of the statements is significant, the first line will be interface 'swp1' the second 'swp2' etc.
cvx1.vm.provision "shell", path: "cvx1_on.sh" - this line calls a external shell script named "cvx1_on.sh" during the boot up process.
Step Four - Shell scripting with Vagrant
The Vagrantfile provides an easy way to build and preset certain variables to be passed to new boxes, the fact that shell scripts can be placed in the file or referenced externally extends this functionality further.
- I'm using a shell script to automate repetitive tasks in the VX build process:
When VX boots the Linux routing protocols daemons are not enabled by default. Official docs show a manual process of rewriting theetc/quagga/daemonsfile, thus this is an obvious task to script. - I'm also setting the hostname for my VX devices which requires a reboot.
#!/bin/bash
sudo service quagga stop #stop the quagga service
sed -i 's/zebra=no/zebra=yes/g' /etc/quagga/daemons #activate zebra daemon
sed -i 's/bgpd=no/bgpd=yes/g' /etc/quagga/daemons #activate bgp daemon
sed -i 's/cumulus/cvx1/g' /etc/hostname #set hostname
sudo reboot # reboot VX to apply new hostname
To use a shell script to provision your Vagrant boxes just save the above file with the .sh extension and reference in your Vagrantfile.
Step Five - Ready to vagrant up
With all the files built we are now ready to provision the VX vagrant environment.
Using Git bash in your VX folder enter vagrant up and both VX nodes should build.
Once the build process has finished, use vagrant ssh cvx1 to log in.
You should hit the Linux shell for cvx1:
$ vagrant ssh cvx1
vagrant@cvx1:~$
To check the routing daemons have started:
vagrant@cvx1:~$ cat /etc/quagga/daemons | grep =yes
zebra=yes
bgpd=yes
Cumulus uses the Linux routing suite, Quagga, and it is within this tool that the routing configuration for the VX nodes is built. Access the Quagga CLI with sudo vtysh
Now anyone with IOS experience should feel at home, from here we can build our BGP configs:
nevilljo@NEVILLJO3 ~/vx_sandpit
$ vagrant ssh cvx1
vagrant@cvx1:~$ sudo vtysh
cvx1# conf t
cvx1(config)# router bgp 65001
cvx1(config-router)# neighbor 192.168.50.2 remote-as 65002
cvx1(config-router)# network 10.1.1.0 mask 255.255.255.0
cvx1(config-router)# exit
cvx1(config)# exit
vagrant@cvx1:~$ exit
logout
Connection to 127.0.0.1 closed.

nevilljo@NEVILLJO3 ~/vx_sandpit
$ vagrant ssh cvx2
vagrant@cvx2:~$ sudo vtysh
cvx2# conf t
cvx2(config)# router bgp 65002
cvx2(config-router)# neighbor 192.168.50.1 remote 65001
cvx2(config-router)# network 20.1.1.0 mask 255.255.255.0
cvx2(config-router)# exit
cvx2(config)# exit
Verify that BGP is established between the two VX:
cvx2# sh ip b s
BGP router identifier 192.168.50.2, local AS number 65002
BGP table version 2
RIB entries 3, using 360 bytes of memory
Peers 1, using 17 KiB of memory

Neighbor        V    AS MsgRcvd MsgSent   TblVer  InQ OutQ Up/Down  State/PfxRcd

192.168.50.1    4 65001       5       6        0    0    0 00:01:21        1

Total number of neighbors 1
cvx2# sh ip b
BGP table version is 2, local router ID is 192.168.50.2
Status codes: s suppressed, d damped, h history, * valid, > best, = multipath,
              i internal, r RIB-failure, S Stale, R Removed
Origin codes: i - IGP, e - EGP, ? - incomplete

   Network          Next Hop            Metric LocPrf Weight Path
*> 10.1.1.0/24      192.168.50.1             0             0 65001 i
*> 20.1.1.0/24      0.0.0.0                  0         32768 i

Total number of prefixes 2
Summary
Hopefully that has provided some insight into how easy it is to build an environment using Cumulus VX with Vagrant. I've created a modest demo but with a few alterations to the scripts and vagrantfile I trust you can see how something much more complex could be up and running in a matter of minutes.
I found digging into Vagrant and VX very rewarding. The way that Vagrant handles those menial tasks for VM builds, and can easily incorporate powerful provisioning tools meant I went from complete novice to 'why the hell haven't I been doing this for years?' in an afternoon. Then when I think that everything for this demo is freely available just makes it all the more positive, and definitely something you should try out yourself.

Footnotes:
Not to be confused with the infamous corridor of uncertainty. ↩︎