Lab on a Laptop - Building a VXLAN Leaf Spine Network with HPE VSRs

Building virtual labs is quick, easy and no one complains about your cabling.
Throughout my career, until very recently, I always had access to a lab of some kind, so when I heard others complaining about lack access to kit I would smile and nod, and politely shut down the conversation if they asked to have a login to my kit.
Now I find I am that guy, sure I can get hold of kit if I ask politely, but it is never the same if you are having to use equipment that someone else maintains, I like full console access and not having to ask before each reboot and config wipe.
So I found myself a different approach and started to work with the HPE VSR. This is a fully-featured Production-ready virtual router running HPE's Comware 7 OS. I use it mainly for lab work, demos, testing configs and protocols but I upset some people if I refer to it as my toy, it is much more than just a virtual lab image. You've got L2, L3 routing prots, IPv6, MPLS & VXLAN, all kinds of business going on. For Prod there is licensing, but to get some hands-on the image is free to download, see below for link.
To give an example of how I use the VSR in my day-to-day, I present to you my:
Lab on a Laptop - Leaf Spine VXLAN
You'll need:
- A laptop (obv) - I'm running 8GB RAM Win 7
- VirtualBox 4.3[1] - or similar. VSR on VMware and KVM is offically supported, VirtualBox not so but works fine for me.
- USB stick (for a little shortcut)
- HPE VSR image For VXLAN use the E0321 train image.
Lab topology
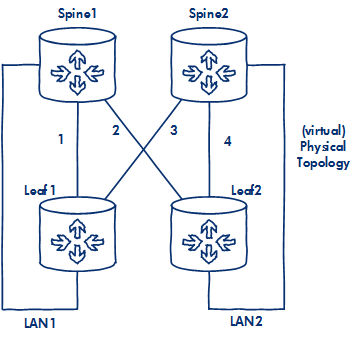

The network uses 4 VSRs to create a basic leaf spine network ready and waiting for the routing protocol of your choice.
I want to test out VXLAN so I need a LAN side node, but rather than create extra load I'm reusing the Spines as IP nodes, hence the additional Spine to Leaf connections, hopefully that makes sense in the logical diagram, I'll be using VRFs to ensure traffic separation.
Step One - Create 4 VSRs
- To create your first VSR, start up a 'New' VirtualBox, selecting the VSR ISO file as the image.
- Ensure you select 'Other Linux (64-bit)' for Version, 1024MB Memory size, you don't need the 8GB default storage, I dropped mine down to 4GB just because.
- By happy coincidence VirtualBox VMs have 4 Network Adapters ready to rock. Check 'Enable Network Adapter', set 'Attached to:' to some arbitrary name for the network segment. I like simple so I've just named the connections '1-4', 'LAN1' & 'LAN2' as you can see in my 'Physical Topology' diagram above. There seems to be no inherent properties to these segments nor DHCP, just like connecting a port to a cable, we will then assign IP addressing directly to the router port.
- To keep things nice and uniform Adapter 1 & 2 are leaf spine connections, Adapter 3 is LAN and Adapter 4 is set to 'Host-only' I'll use this to SSH from the Wins host to each VSR.
- N.B. As previously mentioned the Spines, like Batman, have an alter ego and moon-light as LAN side Nodes, so the Network Adapter setup is the same format for all 4 VSRs, just alter the 'Internal Networks' as appropriate.

Step Two - Boot up
- Booting the first VSR is a simple process, just ensure you enter '1' for Fresh Install then type 'yes', 'yes' and 'Enter' when prompted.
- The VSR should now complete, the 'Press ENTER to get started.' will appear once done, then you can access the VSR Comware 7 CLI.
Step Three - Setup SSH access
The VSR is only accessible via a VirtualBox console which seems to have a problem with 'copy-and-paste', it doesn't work. This is rather annoying because to get SSH up and running there are more commands than I can be bothered to type out each time. I've been using this small workaround, it's pretty dirty but it works.
- Assign the management port to the correct network type, the VSRs do not need to access the Internet nor any external network so I'm going 'Host-Only'.
- On a Wins host, VirtualBox creates an adapter which can be configured with IP addressing in the normal manner, I've gone 192.168.56.0/24:
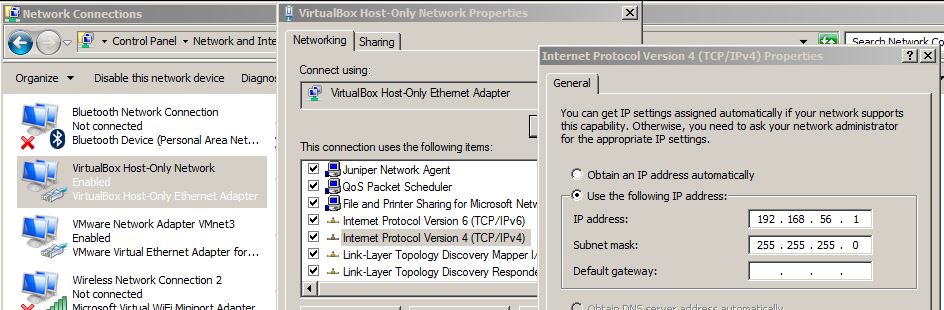
- Config the VSR mgmt interface in that subnet.
- Here's my python script:
import comware
comware.CLI('system-view ;\
ssh server enable ;\
line vty 0 15 ;\
authentication-mode scheme ;\
public-key local create dsa ;\
local-user joe class manage ;\
password simple admin123 ;\
service-type ssh ;\
authorization-attribute user-role network-admin ;\
ssh user joe service-type all authentication-type password ')
- Nothing special here, just using the Comware python API to apply the commands. This will create a user 'joe' and password 'admin123' so obviously change that.
- I use the USB stick, save the script to the USB then make the VSR grab the USB
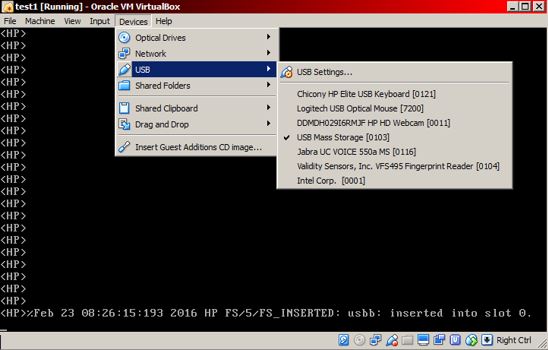
- From the Comware CLI run the script as a normal python file
python ssh1.ph - Fire up putty and all being good you should be able to log in to the VSR.
Step Four - Make like the Galactic Empire and Clone[2]
- Use VirtualBox clone to make three copies of your new VSR, select 'Reinitialize MAC' and 'Full Clone'
- Rename the clones, set the correct Network Adapter LAN segment and alter the Comware mgmt IP address.
Step Five - Comware Leaf Spine Underlay Config
- You should now be able to log in to the VSRs and configure them as usual Comware devices.
- If you are unfamiliar with Comware it is pretty easy to pick up, just search online for 'VSR configuration guide'.
- Rather than copy out all the config, below is a sample of my configuration. This is for a simple OSPF underlay config.
- I'm just using the VSRs like physical devices to play with the control plane here so the VSRs are acting as VTEPs. The underlay config is all about ensuring the VTEP IP addresses are reachable so VXLAN tunnels, the overlay, can be built.
sysname Leaf1
#
#OSPF config
ospf 1 router-id 1.1.1.1
 area 0.0.0.0
#
#Lo0 for VTEP source/destination
interface LoopBack0
 desciption vtep-address
 ip address 1.1.1.1 255.255.255.255
 ospf 1 area 0.0.0.0
#
#Leaf to spine interfaces
interface GigabitEthernet1/0
 port link-mode route
 description to-Spine1
 ip address 172.16.1.1 255.255.255.252
 ospf network-type p2p
 ospf 1 area 0.0.0.0
#
interface GigabitEthernet2/0
 port link-mode route
 description to-Spine2
 ip address 172.16.2.1 255.255.255.252
 ospf network-type p2p
 ospf 1 area 0.0.0.0
- The VSR also supports ISIS, eBGP & iBGP, loads of options for testing different underlays.
Step Six - VXLAN configuration
- For a simple static VXLAN tunnel between the Leaf VSRs I used the following config on Leaf1
 l2vpn enable
#
#vsi ties the switch-instance, vxlan and tunnel together
vsi vpna
 vxlan 10
  tunnel 1
#
#LAN downlink, assign xconnect to apply the vsi
interface GigabitEthernet3/0
 port link-mode route
 description to-LAN1
 xconnect vsi vpna
#
#vxlan tunnel, source/destination are the leaf loopbacks reachable via OSPF
interface Tunnel1 mode vxlan
 source 1.1.1.1
 destination 4.4.4.4
Step Seven - Connect Overlay Nodes
- Now to connect up the devices that will sit in the overlay and generate traffic that will traverse the VXLAN tunnel.
- You have loads of options here, create win/linux clients etc and use the appropriate network adapter setting.
- I'm just reusing the Spines as LAN-side nodes by setting up VRFs on them and using those as the source and destination for my overlay traffic:
 sysname Spine1
#
ip vpn-instance lan1
 route-distinguisher 1:1
 vpn-target 1:1 import-extcommunity
 vpn-target 1:1 export-extcommunity
#
interface GigabitEthernet3/0
 port link-mode route
 ip binding vpn-instance lan1
 ip address 172.17.0.1 255.255.255.0
- Both Spine's will act as overlay nodes in the 172.17.0.0/24 subnet.
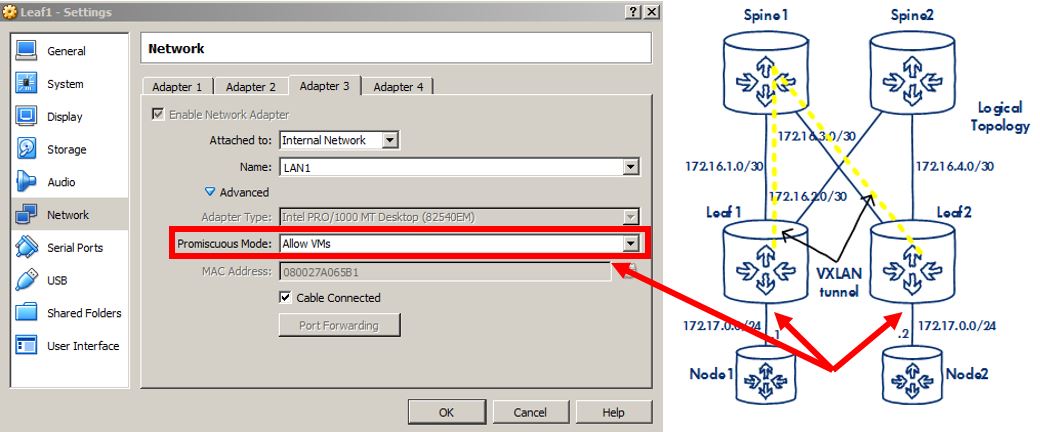
Step Eight - LAN downlink set to Promiscuous
- If you've already configured your overlay nodes and wondering why you can't ping, cool your boots, man.
- The Network Adapters on your Leaf nodes that act as LAN downlinks, Network Adapter 3 / Gi3/0 in my case, need to be set in Virtualbox to 'Promiscuous':
Step Nine - Get testing
- You should now be able to ping between the overlay nodes via the VXLAN tunnel. Turn on debugs, build up tunnels, swap in different underlay protocols, go nuts.
That's it
- Hopefully that has given you some insight into how easy it is to build a lab for hands-on, demos etc using VSRs. This is just a minimal setup, check the config guides, there are loads of protocols and features supported on the device.
- I recently perfomed a live demo of my earlier ADVPN network using just my laptop, with VMs and VSRs acting in lieu of the physical routers.[3]
- Thanks to my buddy, Dik van Oeveren, for the hint about Promiscuous ports.
Final note - Be careful out there!
- This blog covers a design that is quick and dirty for educational purposes. This is not a design for a Production network.
- Obviously guys please don't start building networks for Production that look like my example topology.
- While the VSR is a great resource, some of the features are a bit different from Comware hardware device, especially when it comes to VXLAN.
- So if you are one of the lucky people to get your hands on the hardware or are building networks for real, have a chat with your friendly neighbourhood HPE rep and get them to thrash out a design for you.