Zero Touch Part 2 - Chaining VPNs, Routing & Security

In Part 1 of my Zero Touch write-up I focused on the basics; enabling automatic configuration of a factory-default router, but that is just part of the story.
Pushing config to remote devices has its benefits, but isn't that useful if config changes need to be made on other interconnected devices to accomodate the new installs. What if the network relies on VPNs or advanced security? In this post I'll be looking at how the Zero Touch approach can be extended to draw in other processes across the whole network to enable that remote router to go from first power-on to IPSEC VPN BGP speaker with no CLI interaction.
ADVPN
Zero Touch really helps if there is a lot of tin to deploy. That usually means a form of hub and spoke network, with plently of remote sites. For the majority of owners of networks like this, a third-party carrier is used to provide connectivity, which means authentication and encryption of data is a must. Great, so that means we merely crack out our config guides and set up some GRE over IPSEC.
Fine in the lab, but think about those point-to-point tunnels from hub to spoke. If we have to add config to the hubs for each spoke, that isn't Zero Touch. Now you could suggest pre-configuring the hubs for each spoke beforehand but when we are talking rollouts in the thousands it is very unlikely all the relevant information will be available on Day One.
That's where a feature available on HP routers known as Auto Discovery VPN (ADVPN) comes in.
What is ADVPN?:
- Uses dynamic public addresses[1] to automatically build a VPN network.
- GRE tunnels are Point-to-Multipoint.
- Dynamic hub-and-spoke and spoke-to-spoke connections available.
- Integrated IPSEC for authentication and encryption.
The first benefit is key to how ADVPN fits perfectly into a Zero Touch deployment strategy. Forget having to ask your telco for the addresses of each remote site, which become the tunnel source and destination, ADVPN distributes this information dynamically then builds the tunnels.
The GRE tunnels are also P2MP, so rather than thousands of P2P tunnel interfaces on your hub routers, you can just have one, serving all remote sites.
Demo setup
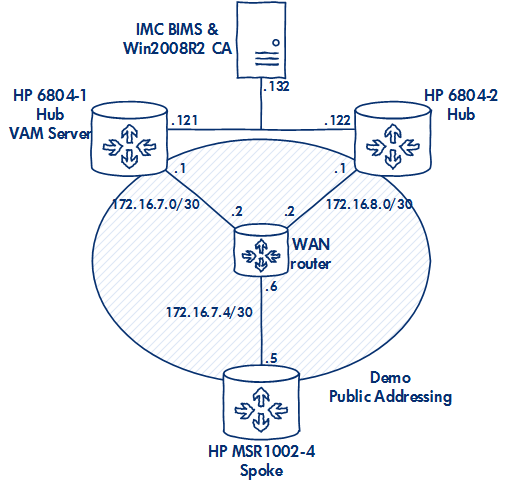
Here is a diagram of my demo network, showing the kit I'm using and the public addressing:
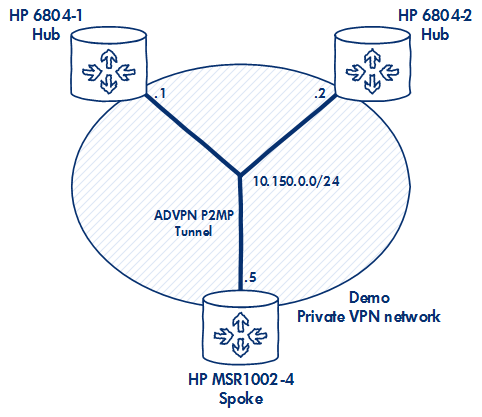
ADVPN will create a VPN overlay P2MP GRE tunnel seen below:
ADVPN Step-by-step
- ADVPN uses VPN Address Management Protocol (VAM) in a client/server model. The VAM server will be located in the central site and must be available on the public network when the clients boot. In my demo I'm using an HP 6804 as the VAM server.
- Clients boot, and obtain their public addressing either statically or via DHCP.
- In our Zero Touch model the downloaded config template will contain the address of the VAM server.
- Clients register themselves and their public addresses with the VAM server.
- Clients download the VAM server's address-map which provides the public addresses of other clients, namely the hub routers.This info becomes the GRE tunnel source and destination.
- A private VPN network is automatically built over the the third party network. No need to touch the hub nor the new spoke router, hence Zero Touch!
I'm running a simple hub & spoke network so spokes will communicate via the hubs, but spoke to spoke dynamic tunnels are also supported.
BGP
I have an adversion to static routes. They have their place, but more than one or two on a device and I start to feel nauseous.
The mantra of Zero Touch is all about automation and dynamism, not trawling through configs to make changes.
For this demo I have eschewed statics and introduced dynamic routing with the only protocol that makes sense for large-scale hub & spoke, eBGP.
Assuming you know the basics of how BGP peer statements are built, warning bells should be ringing. Normally BGP is built using per-peer statements such as the following:
peer 10.150.0.5 as-number 65101
However, I found within Comware that BGP peer statements can be a subnet range rather than the usual /32 host address:
peer 10.150.0.0 24 as-number 65101
With this configured on the hub routers they will passively await TCP SYN packets from the subnet in the peer statement. All we need is one end of the BGP connection to be configured with a /32 neighbour statement. The hub addresses are well-known and static, so for the spokes we can add those addresses to the config template prior to deployment, we can deploy BGP to spokes without touching the hubs.
BGP is a great example of how certain features and protocols can be used to combined to fit into our Zero Touch Master Plan!
Security
Last but not least this network needs some security. As we all know hackers sit in darkened rooms wearing black hoodies and 'V for Vendetta' masks, and we do not want them poking around in our personal data, leave that to Govt. officials.

On a serious note, is becoming increasingly common that customers demand encryption and authentication of their data. It is pretty much a given in many industries today that any data travelling across a WAN needs to be protected using IPSEC.
Pre-shared keys are a quick and dirty way to do this. That may work for some but basing your companies IP security policy on, what is essentially, just a static password is not going to win you employee of the month.
For my demo I have incorporated a Public Key Infrastructure (PKI). This is a means of creating a network rooted at a server which you trust, the Certificate Authority, that has the role of distributing digital certificates that are used by IPSEC instead of pre-shared keys. Cert distibution is controlled and dynamic, not just passwords on Post-It notes. In short, it is more secure.
There is plenty of information out there about PKI if you wish to dig deeper, for now we just need to know that our routers will use digital certs rather than pre-shared keys for their IPSEC.
True to the theme of this write-up I found that all the steps required to enable a new spoke to enter into the PKI can be configured to fire automatically, so that we can flow from unencrypted security policy-violating liabilities to fully IPSEC'ed members of a PKI, all without lifting a finger.
Security Step-by-step
-
First up we need a Certificate Authority. That's a server of your choice that can issue digital certificates. For my demo I am using Wins2008R2, ok chill, let me finish, this was not my choice and was already installed. Other, open-source, CAs are available.
-
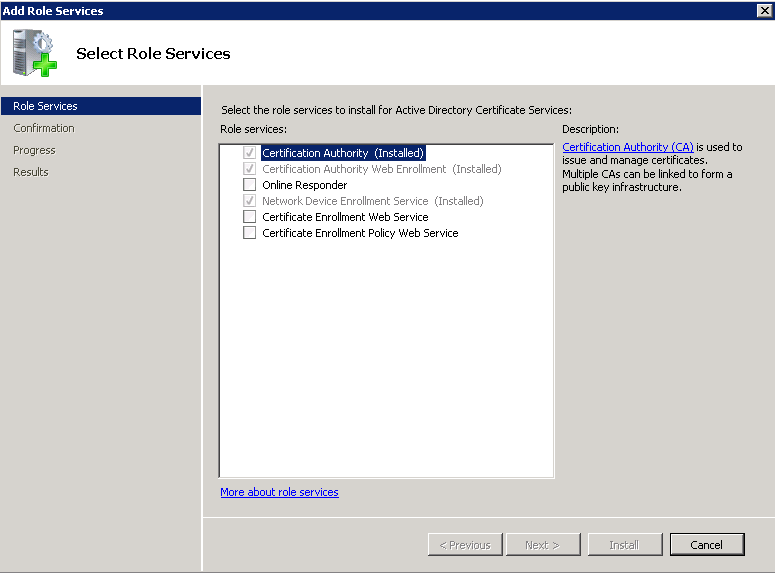
CA function involves a user requesting a cert, which obviously means the user has some identity on the network (username & password). However for network devices, such as our router, this is simply not scalable. We are using a facet of PKI known as Simple Certificate Enrollment Protocol (SCEP) which allows hardware to request certs. Within Wins2008 this function is known as Network Device Enrollment Service. Here is a picture of the enabled roles:
-
The NDES service issues a password to administrators which needs to be added to the config template of our routers to allow the digital certs to be issued. This password is obtained by browsing to: http://server_ip_address/certsrv/mscep_admin/
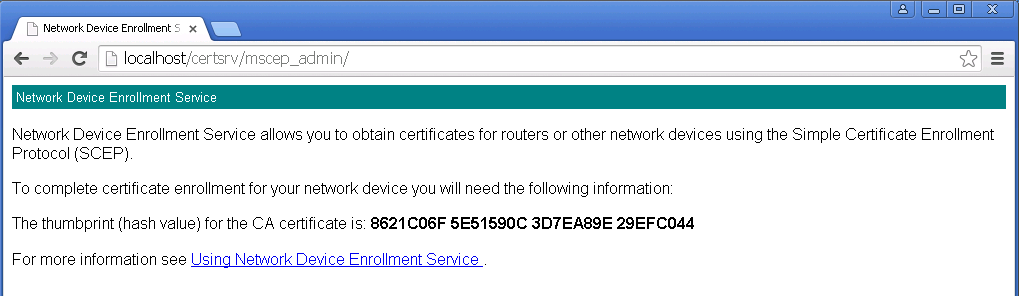 That long thumbprint is the string that we need.
 -
Configure the router with a PKI domain. Here is my config:
pki domain hpnemea
 ca identifier JN-CA8
 certificate request url http://10.200.1.132:80/certsrv/mscep/mscep.dll
 certificate request from ra
 certificate request entity hpnemea
 certificate request mode auto
 public-key rsa general name test123 length 2048
 root-certificate fingerprint md5 8621C06F5E51590C3D7EA89E29EFC044
 undo crl check enable
A few lines are worth focusing on:
certificate request url <url>That's the Wins server.root-certificate fingerprint md5 <string>This is the value we obtained from the Wins server, see the capture above.public-key rsa general name <name> length 2048This command is one of those hooks that allows this function to be activated via Zero Touch. Rather than manually generating public keys, the router will create the keys with a configurable length if there are none. These keys are needed to obtain the certs from the server.certificate request mode autoThe final piece of the puzzle, this tells the router to automatically request digital certs from the CA if none are found.
For those who are not inclined to RTFM when it comes to config guides here is the rest of the PKI and IPSEC config:
pki entity hpnemea
 common-name msr1k
 country UK
 locality Q100
 fqdn msr1002-4.hpnemea.com
 organization-unit NI
 organization hpnemea.com
#
ipsec transform-set tra1
 encapsulation-mode transport
 esp encryption-algorithm aes-cbc-128
 esp authentication-algorithm sha1
#
ipsec profile pro1 isakmp
 transform-set tra1
 ike-profile ike1
#
ike profile ike1
 certificate domain hpnemea
 exchange-mode aggressive
 match remote identity address 0.0.0.0 0.0.0.0
 proposal 10
#
ike proposal 10
 authentication-method rsa-signature
 encryption-algorithm aes-cbc-128
 dh group2
- 5. Now we just need to add IPSEC to the ADVPN tunnel and we are done:
interface Tunnel5 mode advpn gre
 tunnel protection ipsec profile pro1
Summary
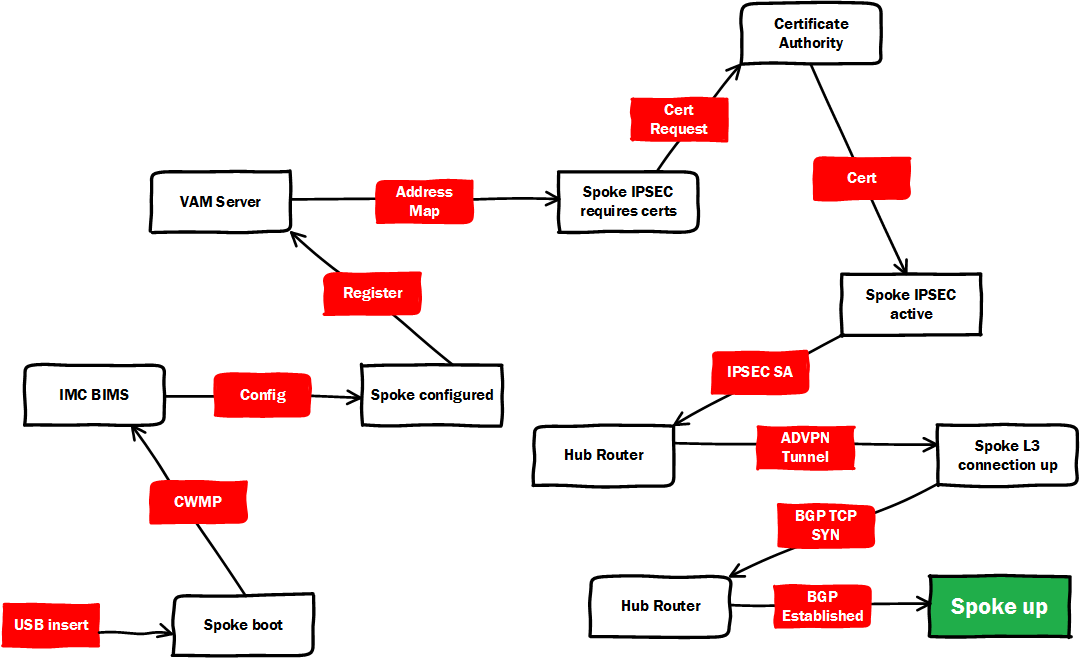
To recap we now have a solution that allows a factory default router to boot up, download its config, build P2MP GRE tunnels that are encrypted using digital cert based IPSEC and establish BGP sessions. All without touching the hub nor spoke CLI.
Here is a diagram of the flow:
By public I am referring to an address that is available in the global routing table of a device. In this demo the public addressing comes from the third-party carrier. Private addressing belongs to the tenant e.g. within the VPN tunnels, remote site & DC LANs. ↩︎